In this post I will show you how to get a filename.cu CUDA program to compile in
Visual Studio 2005
on my 64-bit
laptop for a 32-bit target. To get
CUDA to compile in visual studio on a 64 bit machine for a 32 bit target, you will have to make some changes to the directives to nVIDIA's compiler (nvcc.exe). But before we go to far we first need to get the CUDA rules set up. In order to accurately document the process I will take a the long way and explain it step by step for all the newbs out there like me (this was a painful learning process). So here are the steps:
1. Make an empty project (file->new->project) in VS that is a win32 console based application. Then hit next

2. De-select pre-compiled headers and select empty project then finish:

3. Right-click on the source folder under the project and go to ->add->new item->code then on right side select cpp file. Then name the file *
filename.cu (*note the .cu extension).

4. Then you want to add the build rules for that file. These can be found here:
C:\ProgramData\NVIDIA Corporation\NVIDIA GPU Computing SDK\C\common
5. Right click on your project and select 'Custom Build Rules':

6. The go to find existing. Then browse to (or wherever you put yours):
C:\ProgramData\NVIDIA Corporation\NVIDIA GPU Computing SDK\C\common

7. Then make sure that you select the CUDA Build Rule v2.3.0:

8. Now, I have my compiler set up for CUDA files. But because I am on a 64 bit machine and have selected 32 bit target

I will have compiler problems such as the following error:
Error 1 fatal error LNK1112: module machine type 'x64' conflicts with target machine type 'X86' c:\Users\trbttn\Documents\Visual Studio 2005\Projects\cudaEnvSetup\cudaEnvSetup\debug\main.cu.obj
I can fix this by right-clicking on the project->options->CUDA Build Rule v2.3.0. Then clicking on extra opotions. Then entering '--machine 32'. This tells the nvcc compiler that the target is 32 bit

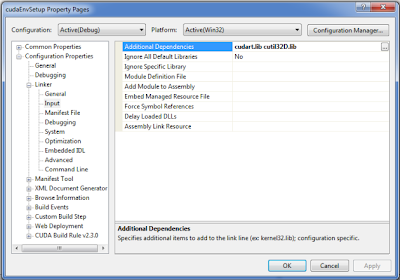
Now you will be able to compile to 32 bit targets from 64 bit os. However, now you must set up your libraries so that you wont get the following errors:
Error 1 error LNK2019: unresolved external symbol ___cudaUnregisterFatBinary@4 referenced in function ___cudaUnregisterBinaryUtil main.cu.obj
Error 2 error LNK2019: unresolved external symbol ___cudaRegisterFatBinary@4 referenced in function ___sti____cudaRegisterAll_39_tmpxft_00000ebc_00000000_6_main_cpp1_ii_9fdf4b28 main.cu.obj
Error 3 error LNK2019: unresolved external symbol _main referenced in function ___tmainCRTStartup LIBCMT.lib
Error 4 fatal error LNK1120: 3 unresolved externals C:\Users\trbttn\Documents\Visual Studio 2005\Projects\cudaEnvSetup\Debug\cudaEnvSetup.exe
The library files that you will need are included in two places:
1. In the CUDA toolkit installation directory:
C:\CUDA\lib for 32bit
and
C:\CUDA\lib64 for 64 bit
2. In the CUDA SDK found here (but will not be needed to compile so I will discuss in the next post):
C:\ProgramData\NVIDIA Corporation\NVIDIA GPU Computing SDK\C\common\lib
Now because the toolkit I installed was for a 64 bit machine, the default environment variables form the toolkit were installed as follows:
1. CUDA_BIN_PATH = c:\CUDA\bin64
2. CUDA_LIB_PATH = c:\CUDA\lib64
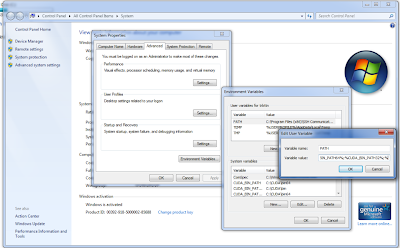
But, these have to be changed if I am to reference them as additional include libraries in my project so based on the posts referenced below, I made four environment variables as follows:
1. CUDA_LIB_PATH32 with a value of c:\CUDA\lib
2. CUDA_LIB_PATH64 with a value of c:\CUDA\lib64
3. CUDA_BIN_PATH32 with a value of c:\CUDA\bin
4. CUDA_BIN_PATH64 with a value of c:\CUDA\bin64
and then added the following to my PATH variable:
%CUDA_BIN_PATH64%;%CUDA_BIN_PATH32%
Remember that for environment variables to be accessible the computer must be restarted.
You should be able to rebuild and compile without any errors at this point.
The is the output I got:
__________________________________________________________________________
1>------ Rebuild All started: Project: cudaEnvSetup, Configuration: Debug Win32 ------
1>Deleting intermediate and output files for project 'cudaEnvSetup', configuration 'Debug|Win32'
1>Compiling with CUDA Build Rule...
1>"C:\CUDA\bin64\nvcc.exe" --machine 32 -arch sm_10 -ccbin "C:\Program Files (x86)\Microsoft Visual Studio 8\VC\bin" -Xcompiler "/EHsc /W3 /nologo /O2 /Zi /MT " -maxrregcount=32 --compile -o "Debug\main.cu.obj" "c:\Users\trbttn\Documents\Visual Studio 2005\Projects\cudaEnvSetup\cudaEnvSetup\main.cu"
1>main.cu
1>tmpxft_00000890_00000000-3_main.cudafe1.gpu
1>tmpxft_00000890_00000000-8_main.cudafe2.gpu
1>tmpxft_00000890_00000000-3_main.cudafe1.cpp
1>tmpxft_00000890_00000000-12_main.ii
1>Compiling...
1>main.cpp
1>Compiling manifest to resources...
1>Linking...
1>LINK : C:\Users\trbttn\Documents\Visual Studio 2005\Projects\cudaEnvSetup\Debug\cudaEnvSetup.exe not found or not built by the last incremental link; performing full link
1>LINK : warning LNK4098: defaultlib 'LIBCMT' conflicts with use of other libs; use /NODEFAULTLIB:library
1>Embedding manifest...
1>Build log was saved at "file://c:\Users\trbttn\Documents\Visual Studio 2005\Projects\cudaEnvSetup\cudaEnvSetup\Debug\BuildLog.htm"
1>cudaEnvSetup - 0 error(s), 1 warning(s)
========== Rebuild All: 1 succeeded, 0 failed, 0 skipped ==========
__________________________________________________________________________
*Notice the LINK4098 warning. This is because I had different runtime libraries selected.
This is from
sprevrha2 on the nVIDIA forum.
"I noticed that the CUDA build rule does not automatically switch linkage of the multithreading runtime libs from release /MT to debug /MTd for the Debug compile targets. However, the MSVS C++ build targets do that, hence a conflict is generated. To avoid it, right-click on your project, select properties, go to the cuda build rule (I use CUDA build rule v3.0.0) / Hybrid CUDA/C++ options and set the runtime library to Multi-Threaded Debug (/MTd) for your debug and EmuDebug configurations. "
This is what is going on:

So to fix this problem, change the CUDA Build Rule v2.3.0->Hybrid CUDA/C++ runtime library to be the same as C/C++ Code Generation->Runtime Library for each configuration this problem will go away.
Now you should successfully be able to compile a
filename.cu in visual studio without any errors or warnings. Please post your comments and click follow on the right to follow the CUDA learning process with me.


